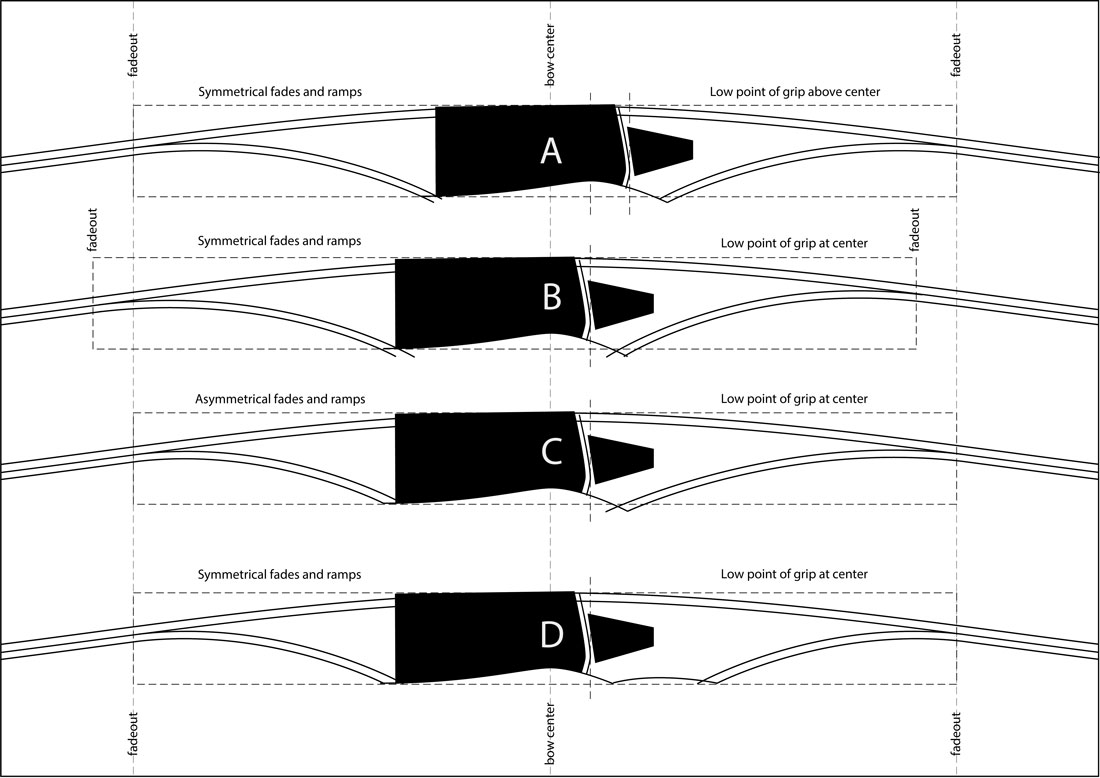
I’ve experimented with making longbows with four different riser layouts. Riser A represents probably the…
How to make a simple bow
When I was a young boy, my brothers and I used to make a bow out of a hardwood stick and a piece of string. This was always a fun project. Sometimes I like just messing around and decide to make a bow out of a stick harvested from the woods behind my house. You know, not every bow has to be what I call a “glam” bow…a glamorous, fiberglass laminated bow. Primitive bows made from natural materials have a beauty all of their own. Plus, they are cheap and easy to make. If you have always wanted to learn how to make a bow, but don’t have a woodworking shop, or expensive shop tools, you might consider learning how to make wood bows first. Heck, you might get hooked! Wood bows are a pleasure to make and shoot. In fact, one of my primitive bow making friends challenged me at a shoot one time that if I made many wood bows that I might get hooked and never go back to fiberglass. I guess that could be true! Anyway, don’t let a low budget stop you from making bows! Stone age man made bows out of a stick or small tree with a piece of a rock for a scraping tool. I think if he could afford his bow making hobby, then you and I probably can afford to make bows, too. Starting out making wood bows is the best way to start in my opinion. It teaches you how to make wood bend and the basic skills of tillering a bow.
I enjoyed reading the following article from Wikipedia and I thought that you might enjoy it, too. It teaches how to make a simple bow and arrow with materials that anyone can afford.
————————–
“How to make the bow
Once the weapon of choice for everyone from Native Americans to Turkish armies, the bow is one of the oldest hunting (and fighting) tools on Earth. While it is not a match for modern weaponry—or indeed for modern archery equipment—a primitive bow can still save your life if you have to hunt to survive in the wilderness.
A high quality bow can take weeks or months to cure and construct, but a simpler version can be made relatively quickly and with readily available materials. The instructions below, based largely on the U.S. Army Survival Manual FM 21-76, can teach you how to construct a “field-expedient” bow.
1. Choose a piece of wood for the bow or stick. This piece of wood should be flexible, such as juniper or mulberry. You can even use a shaft of bamboo or cane but take care that it is not too thick. For that you can use a young bamboo which is strong as well as flexible. Find a piece of dry, dead but not gray and cracking hardwood—oak, lemon tree wood, hickory, yew, black locust, or teak for example—about 1 meter (1 yard +/-) in length. The wood should be free of knots, twists or limbs. Green wood can be used if absolutely necessary, but it should be avoided because it does not provide the same power as dry wood. If using green wood, try for pine. It is the easiest to cut, and clean. Steel wool is usable to clean it off. Also if using green wood, skin it and soak it in hot water. This will help the bow to bend. If it is green wood once you bend it you can smoke it over a fire to dry it; just don’t hold it so close that it burns. Also try to get one that curves enough, so that when you release arrows, the string doesn’t slap the side of your hand which is very painful.
2. Determine the natural curve of the stick. Every piece of wood will have a natural curve, no matter how slight. As you construct the bow, be mindful of the curve.
3. Shape the bow. Ideally, you will want the bow to be strong (and hence thicker) in the center. A thick center will also serve as a good handle. Using a knife or similar tool, shave wood off the inside of the curve (the side that faces behind you when shooting) on the thicker half of the stick until it has the same width and pull as the thinner half. If the stick is roughly the same diameter all along its length, you may need to shave both ends to some degree. You want the bow to end up with a thick, strong center portion flanked by two thinner, more flexible end segments of roughly the same thickness and length.
4. Cut notches to hold the bow string. Use your knife to cut notches about 1-2 inches from each end of the bow. The notches should be in the shape of a half moon on the outside of the bow’s curve.
5. Select a bow string. The string can be made of rawhide, thin nylon rope, hemp cord, fishing line, strands of cotton or silk from caterpillars, perhaps even vines or sinew. If you are stranded in the wilderness, it may be difficult to find a suitable string, and you may need to try a variety of materials before you find one that has the necessary strength. The string should not be stretchy, as the power comes from the wood, not the string. Some ordinary twine will do fine.
How to make the arrows
1. Select sticks for arrows. Some strong, straight plants for arrows are goldenrod and mullen. They can be found in fields. Arrows should be formed from the straightest sticks you can find. The wood should be dry and dead, however green wood does work if you can give it some extra time to dry out naturally, as the sap may ignite if placed over a fire to dry; each arrow should be about half as long as the bow, or as long at the bow can draw back. It does not work to have arrows that can’t be pulled back to the bow’s potential.
2. Shape the arrows. You will need to whittle the wood smooth around the circumference of the arrow. You can straighten an arrow by gently heating the shaft over hot coals—do not scorch or burn the wood—and then holding the arrow straight while the wood cools. Carve a small notch at the back end of each arrow to accommodate the bow string.
3. Construct the arrowheads. The simplest arrowhead is simply a carved point on the front of the arrow shaft. You can whittle such a point with a knife and then fire harden it by gently heating it in coals (again, be careful not to burn or scorch the wood). You can also construct an arrowhead from metal, stone, glass, or bone and attach it to the arrow’s tip by notching the wood, inserting the arrowhead into the notch, and then lashing the arrowhead to the wood with some sort of string or cord.
4. Find some feathers to make the fletchings and glue them (if possible) onto the back ends of the arrows. You could also split back of the arrow, slide the feather in, and tightly wrap a thin thread ( possibly obtained from your own clothes) around the fletching. If a fletching is not feasible, skip this step. While fletching improves the arrow’s flight, it is not necessary for a field-expedient weapon.
Tips
- To make a fire using the bow you will need to gather dry moss, dryer lint, or other suitable tinder, a piece of hard wood that fits into your palm, and a piece of soft wood (softer than your arrow shaft). Cut a nock in the soft wood approximately 3 centimetres deep running the thickness of the wood, place this nock directly upon the tinder. Drill a small hole into the hard, palm-sized wood slightly larger than the diameter of your arrow shaft and no deeper than 5-10 millimetres. Twist a de-headed arrow into the string of the bow and place the butt of the arrow into the hole drilled into the hard wood. CAREFUL, as the arrow will want to twist out of the string and may injure you. Place the tip of the arrow into the nock of the soft wood. Begin pulling the bow back and forth, keeping the motion steady and even. The soft wood will begin to heat, smoke, and will eventually produce a small ember. This ember should fall into your pile of tinder. If carefully nursed, and blown upon until small flames appear, the pile can be picked up and carried by the bottom, carefully, and quickly to a prepared fire site.
- If you plan to fish with your bow, make sure to aim slightly below the fish due to the angle of refraction from the water. Fletching is also not needed if you plan to fish with your bow.
- The bow and arrow detailed here is meant to be temporary and will not have a long life. Fortunately, you can relatively easily construct a replacement.
- The U.S. Army Survival Manual FM 21-76, a public-domain resource, provides instructions for a variety of tools and weapons, and is a goldmine of survival tips. You can easily find a used copy online or in military surplus stores, and it can be purchased as a slightly changed reprint at some bookstores. The entire manual is also available free of charge in PDF format on the website for the Equipped to Survive Foundation.
- You can increase the bow’s power by making two identical bows and lashing them together front-to-front (so that they form an “X” when viewed from the side) with string or rope. They should be tied together at the tips. Attach the bow string to only one of the bows. This is sort of a primitive crossbow.
- Additional Tip: Tightly wrap the bow with a wet strip of leather around the center two thirds of the bow (before stringing) and let it dry naturally. This will give your bow extra strength to resist breakage and should allow you to project arrows at a greater velocity.
- You can carve a notch about a centimeter into the wood and an inch up to put your arrows on once your bow is pulled back(to rest the arrow on, and keep it from wobbling).
- When you are testing a bow’s draw weight, do not dry fire, or let go of the bowstring without an arrow on it. This will damage the bow over time.
- When making arrows, it is not necessary to fletch them, simply cut thin shavings off the wood, and leave them attached at one end, when bent up, these should act as make-shift and easy to construct flights. Do not let them run across your hand, follow the above tip to avoid that problem.”
————————–
Click here to read the original article at Wikipedia.
Wasn’t that an awesome article? I hope maybe it inspired you to go out and harvest some bow wood in your yard and make a bow. Don’t let this tough economy slow you down. You can always afford to make a bow! Plus, you might discover that you like making primitive bows. 🙂
Related Posts
This is how we made our bow and arrow, these tips helped us a lot http://howtofixstuff.blogspot.ca/2012/04/how-to-make-bow-and-arrow.html.